In this post, we will talk about how to run Visual ChatGPT in Python with Google Colab. ChatGPT has garnered huge popularity recently due to its capability of human style response. As of now, it only provides responses in text format, which means it cannot process, generate or edit images. Microsoft recently released a solution for the same to handle images. Now you can ask ChatGPT to generate or edit the image for you.
In the image below, you can see the final output of Visual ChatGPT - how it looks like.
Benefits of Visual ChatGPT
It has a variety of benefits ranging from generating images to advanced editing capabilities of images
- Generate image from user input text
- Remove object from the photo
- Replace one object with the other object from the photo
- It can explain what is inside in the photo
- Make the image look like a painting
- Edge detection
- Line detection
- Hed detection
- Generate image condition on soft Hed boundary image
- Segmentation on image
- Generate image condition on segmentations
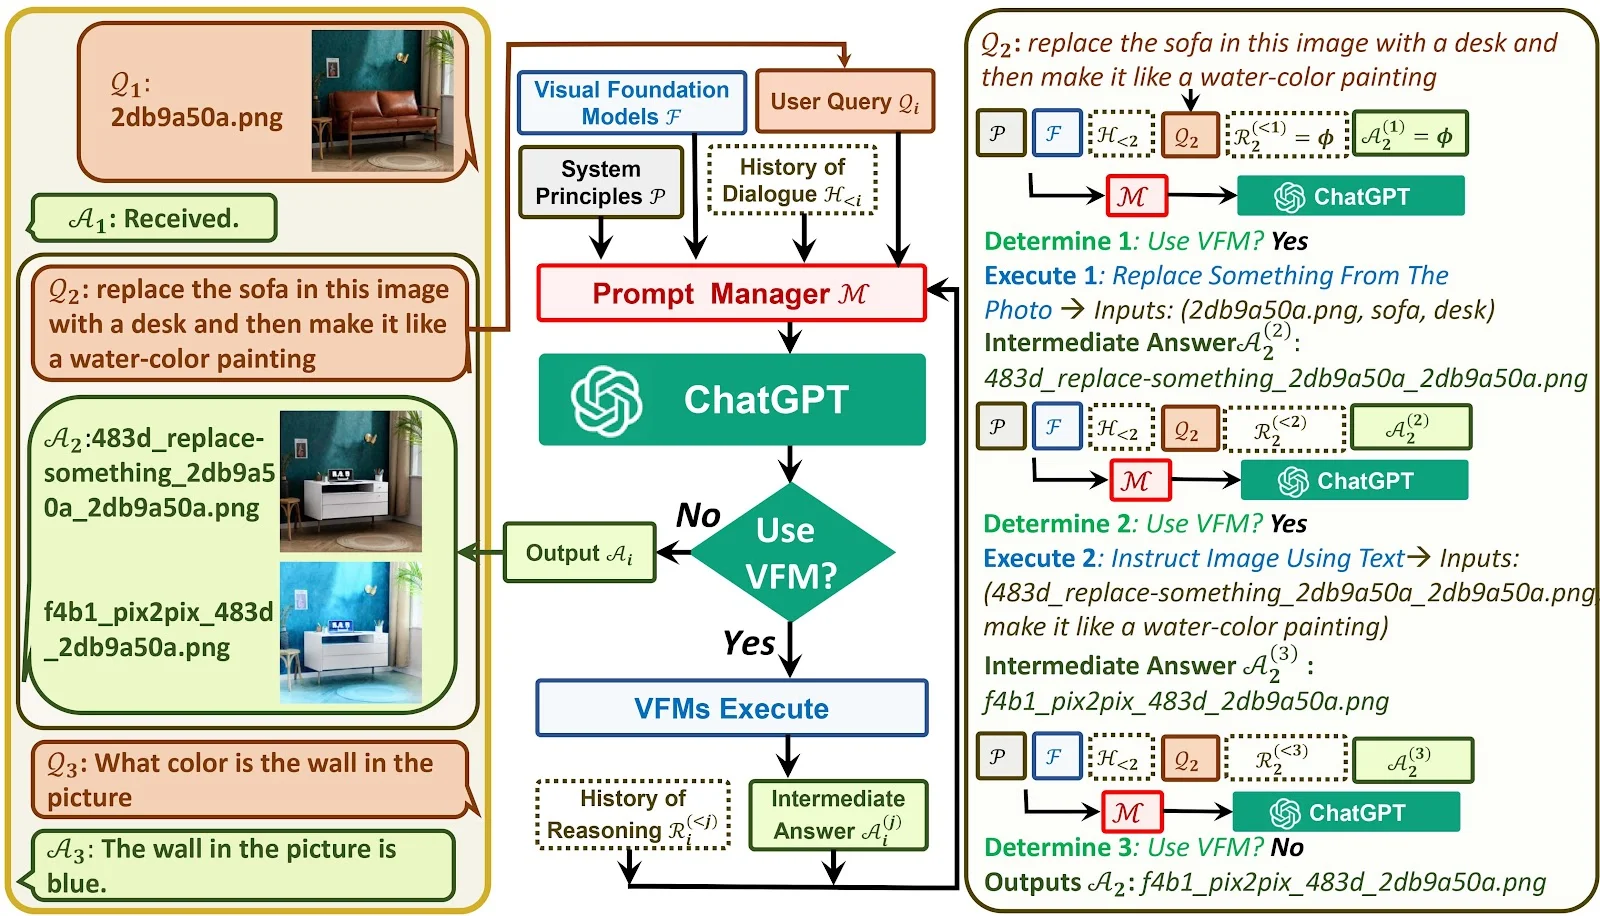
How Visual ChatGPT works
It integrates different Visual Foundation Models with ChatGPT. In simple terms, Visual Foundation Models are advanced algorithms for editing images. With the use of these visual foundation models, it results to ChatGPT can also handle user requests of generating and editing images. It is not just capable of understanding instructions (search query) of user, it also has feedback loop of modifying and improving the output based on feedback.
The source of the image below is the official Microsoft Visual ChatGPT Github repository.
Steps to run Visual ChatGPT
Since this is a memory-intensive task which requires high computation and GPU, we are using Google Colab. Colab provides free access to GPU resources, solves the problem of purchasing expensive hardware. It is available from anywhere with just an internet connection, also allows managing version control for projects.
Check out my Google Colab notebook.
import sys
sys.path.append("/usr/local/lib/python3.8/site-packages")
!git clone https://github.com/deepanshu88/visual-chatgpt.git
Cloning into 'visual-chatgpt'...
remote: Enumerating objects: 129, done.
remote: Counting objects: 100% (90/90), done.
remote: Compressing objects: 100% (65/65), done.
remote: Total 129 (delta 62), reused 32 (delta 25), pack-reused 39
Receiving objects: 100% (129/129), 6.13 MiB | 24.06 MiB/s, done.
Resolving deltas: 100% (69/69), done.
The folder structure of this repos is as follows.
├── assets
│   ├── demo.gif
│   ├── demo_short.gif
│   └── figure.jpg
├── LICENSE.md
├── README.md
├── requirements.txt
└── visual_chatgpt.py
%cd visual-chatgpt
requirement.txt file.
!curl https://bootstrap.pypa.io/get-pip.py -o get-pip.py
!python3.8 get-pip.py
!python3.8 -m pip install -r requirements.txt
To get started with the OpenAI API, go to the website platform.openai.com and sign up for an account using your Google or Microsoft email address. The crucial step after signing up is to obtain a secret API key that will allow you to access the API.
%env OPENAI_API_KEY=sk-xxxxxxxxxxxxxxxxxxxxxxxxxxxxxxxxxxxxxxxxx
!python3.8 ./visual_chatgpt.py --load Text2Image_cuda:0,ImageCaptioning_cuda:0,VisualQuestionAnswering_cuda:0,Image2Canny_cpu,Image2Line_cpu,Image2Pose_cpu,Image2Depth_cpu,CannyText2Image_cuda:0,InstructPix2Pix_cuda:0,Image2Seg_cuda:0
Complete code : Visual ChatGPT
# Create an environment with Python 3.8
import sys
sys.path.append("/usr/local/lib/python3.8/site-packages")

# Download Git Repos
!git clone https://github.com/deepanshu88/visual-chatgpt.git

# Set working directory
%cd visual-chatgpt

# Install the required packages
!curl https://bootstrap.pypa.io/get-pip.py -o get-pip.py
!python3.8 get-pip.py
!python3.8 -m pip install -r requirements.txt

# Enter ***OPENAI API KEY*** below
%env OPENAI_API_KEY=sk-xxxxxxxxxxxxxxxxxxxxxxxxxxxxxxxxxxx

# Run Visual ChatGPT
!python3.8 ./visual_chatgpt.py --load Text2Image_cuda:0,ImageCaptioning_cuda:0,VisualQuestionAnswering_cuda:0,Image2Canny_cpu,Image2Line_cpu,Image2Pose_cpu,Image2Depth_cpu,CannyText2Image_cuda:0,InstructPix2Pix_cuda:0,Image2Seg_cuda:0
Visual Foundation Models : Memory Usage
I am using the below 10 models only due to insufficient GPU resources in Colab. In other words, I had to restrict to these 10 models only as I am using free GPU offered by Colab, not the paid premium GPUs.
- Text2Image
- ImageCaptioning
- CannyText2Image
- InstructPix2Pix
- VisualQuestionAnswering
- Image2Canny
- Image2Line
- Image2Pose
- Image2Depth
- Image2Seg
There are more than 20 models available for use. See the list below. You can use them as per your requirement.
ImageCaptioning_cuda:0
Text2Image_cuda:0
Image2Depth_cpu
InstructPix2Pix_cuda:0
Image2Seg_cpu
Image2Hed_cpu
NormalText2Image_cuda:0
ImageEditing_cuda:0
Image2Canny_cpu
DepthText2Image_cuda:0
Image2Scribble_cpu
SegText2Image_cuda:0
HedText2Image_cuda:0
Image2Line_cpu
PoseText2Image_cuda:0
CannyText2Image_cuda:0
VisualQuestionAnswering_cuda:0
ScribbleText2Image_cuda:0
Image2Pose_cpu
Image2Normal_cpu
LineText2Image_cuda:0
| Foundation Models | GPU Memory (GB) |
|---|---|
| ImageEditing | 3.9 |
| InstructPix2Pix | 2.8 |
| Text2Image | 3.4 |
| ImageCaptioning | 1.2 |
| Image2Canny | 0 |
| CannyText2Image | 3.5 |
| Image2Line | 0 |
| LineText2Image | 3.5 |
| Image2Hed | 0 |
| HedText2Image | 3.5 |
| Image2Scribble | 0 |
| ScribbleText2Image | 3.5 |
| Image2Pose | 0 |
| PoseText2Image | 3.5 |
| Image2Seg | 0.9 |
| SegText2Image | 3.5 |
| Image2Depth | 0 |
| DepthText2Image | 3.5 |
| Image2Normal | 0 |
| NormalText2Image | 3.5 |
| VisualQuestionAnswering | 1.5 |
These are different models of ControlNet+SD1.5 trained to control SD using various image processing techniques
- ImageEditing: Replace or remove an object from image
- InstructPix2Pix: Style of the image to be like something
- Text2Image: Generate an image of an object
- ImageCaptioning: Explain the image
- Image2Canny: Canny edge detection
- CannyText2Image: Generate a new image of object or something from this canny image
- Image2Depth: Depth of image estimation
- Image2Hed: HED edge detection (soft edge)
- Image2Line: Detect the straight line of the image
- Image2Normal: Normal map to control SD
- Image2Pose: Human pose detection
- Image2Scribble: Human scribbles
How to fix common issues
RuntimeError: CUDA error: invalid device ordinalSolution : Replace allOutOfMemoryError: CUDA out of memorycuda:\dwithcuda:0invisual_chatgpt.pyfile. This error occurs because you don't have enough graphic card.
Solution : This error occurs because you don't have enough GPU resources available to run visual foundation models. To fix this, you need to ignore some of the models which you don't need inopencv-contrib-python==4.3.0.36 Has been Yankeddownload.shandvisual_chatgpt.pyfiles. Undervisual_chatgpt.pyfile, modifyself.toolssection of the code to include/exclude some visual foundation models.
Solution : Use this versionopencv-contrib-python==4.5.1.48inrequirement.txtfile.
How is Visual ChatGPT different from Image Editing Software?
Visual ChatGPT understands questions of user and then create or edit image accordingly. Whereas Image Editing softwares don't have capability to comprehend user input text. Visual ChatGPT also performs further modification as per feedback from user. Visual ChatGPT has advanced editing capabilities like removing object from the image or replace it with the other object. It can also explain in simple English what is contained within the photo.

Deepanshu founded ListenData with a simple objective - Make analytics easy to understand and follow. He has over 10 years of experience in data science. During his tenure, he worked with global clients in various domains like Banking, Insurance, Private Equity, Telecom and HR.
Share Share Tweet