In this post we will cover how you can develop your own ChatGPT clone with shiny. Since the release of ChatGPT, Chatbots are becoming more popular day by day. You can build them to interact with internal and external stakeholders. You don't need web developers to build them. You can easily do with Shiny which is a web application framework for R. It can be deployed on Intranet or a public website, depending on your requirement. We will explore OpenAI API and intergrate it in Shiny App.
Benefits of ChatGPT Clone over ChatGPT Website
There are several benefits of building ChatGPT clone over using publicly available ChatGPT Website.- You can create a custom interface that suits your specific needs. For example putting a logo of your website
- You can integrate it into your own website. Adding a chatbot feature into your website.
- It is cost effective as compared to monthly paid subscription of ChatGPT website. APIs cost less than the monthly subscription. Imagine if you have 100+ users, it would be cheap to build the chatgpt clone internally rather than allowing each of them for monthly subscription.
Demo : ChatGPT clone in Shiny
I have deployed the app on Shinyapps.io for demonstration purpose. You can also see it in the animated image below.
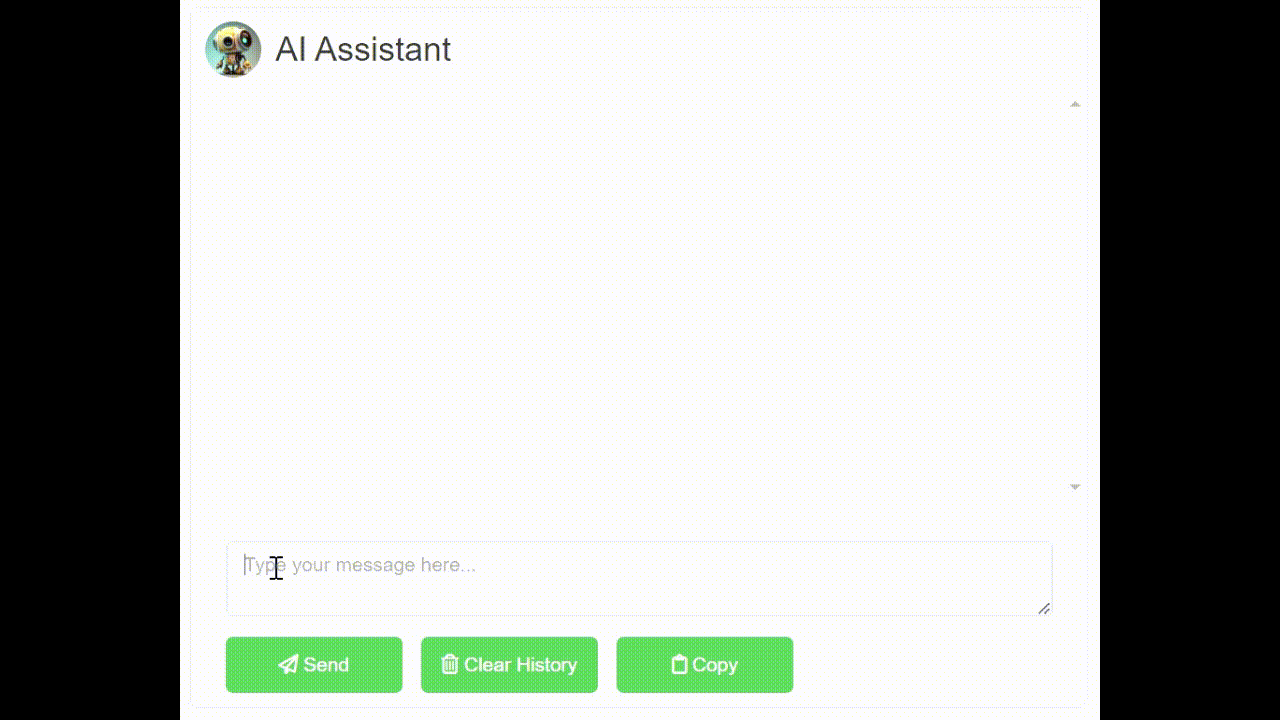
You can download my files from my github repos. It is important to maintain the same folder structure. See the folder structure below. We are also leveraging Javascript and SCSS file for better interactivity in shiny app. SCSS allows us to define and use variables which makes CSS more organized and easier to maintain.
├── app.R
└── www/
    ├── boy.avif
    ├── chat.scss
    ├── girl.avif
    └── TnUa864.png
In order to use this shiny app, you need to have the OpenAI API. Sign up using this link - platform.openai.com. Then need to generate secret API key
R Code
library(shiny)
library(httr)
library(sass)
library(markdown)
library(waiter)
library(shinyjs)
library(shinyCopy2clipboard)
# remotes::install_github("deepanshu88/shinyCopy2clipboard")

css <- sass(sass_file("www/chat.scss"))
jscode <- 'var container = document.getElementById("chat-container");
if (container) {
  var elements = container.getElementsByClassName("user-message");
  if (elements.length > 1) {
    var lastElement = elements[elements.length - 1];
    lastElement.scrollIntoView({
      behavior: "smooth"
    });
  }
}'

chatGPT_R <- function(apiKey, prompt, model="gpt-5.4") {
  response <- POST(
    url = "https://api.openai.com/v1/chat/completions",
    add_headers(Authorization = paste("Bearer", apiKey)),
    content_type("application/json"),
    encode = "json",
    body = list(
      model = model,
      messages = list(
        list(role = "user", content = prompt)
      )
    )
  )

  if(status_code(response)>200) {
    result <- trimws(content(response)$error$message)
  } else {
    result <- trimws(content(response)$choices[[1]]$message$content)
  }

  return(result)

}

execute_at_next_input <- function(expr, session = getDefaultReactiveDomain()) {
  observeEvent(once = TRUE, reactiveValuesToList(session$input), {
    force(expr)
  }, ignoreInit = TRUE)
}

# Define UI for application
ui <- fluidPage(
  useWaiter(),
  useShinyjs(),
  use_copy(),
  tags$head(tags$style(css)),
  sidebarLayout(
    sidebarPanel(
      textInput("apiKey", "API Key", "sk-xxxxxxxxxxxxxxxxxxxx"),
      selectInput("model", "Model", choices = c("gpt-5.4", "gpt-5.3"), selected = "gpt-5.4"),
      style = "background-color: #fff; color: #333; border: 1px solid #ccc;"
    ),

    mainPanel(
      tags$div(
        id = "chat-container",
        tags$div(
          id = "chat-header",
          tags$img(src = "TnUa864.png", alt = "AI Profile Picture"),
          tags$h3("AI Assistant")
        ),
        tags$div(
          id = "chat-history",
          uiOutput("chatThread"),
        ),
        tags$div(
          id = "chat-input",
          tags$form(
            column(12,textAreaInput(inputId = "prompt", label="", placeholder = "Type your message here...", width = "100%")),
            fluidRow(
              tags$div(style = "margin-left: 1.5em;",
                       actionButton(inputId = "submit",
                                    label = "Send",
                                    icon = icon("paper-plane")),
                       actionButton(inputId = "remove_chatThread",
                                    label = "Clear History",
                                    icon = icon("trash-can")),
                       CopyButton("clipbtn",
                                   label = "Copy",
                                   icon = icon("clipboard"),
                                  text = "")

              ))
          ))
      )
    ))
)

# Define server logic
server <- function(input, output, session) {

  historyALL <- reactiveValues(df = data.frame() , val = character(0))

  # On click of send button
  observeEvent(input$submit, {

    if (nchar(trimws(input$prompt)) > 0) {

      # Spinner
      w <- Waiter$new(id = "chat-history",
                      html = spin_3(),
                      color = transparent(.5))
      w$show()

      # Response
      chatGPT <- chatGPT_R(input$apiKey, input$prompt, input$model)
      historyALL$val <- chatGPT
      history <- data.frame(users = c("Human", "AI"),
                            content = c(input$prompt, markdown::mark_html(text=chatGPT)),
                            stringsAsFactors = FALSE)
      historyALL$df <- rbind(historyALL$df, history)
      updateTextInput(session, "prompt", value = "")

    # Conversation Interface
    output$chatThread <- renderUI({
      conversations <- lapply(seq_len(nrow(historyALL$df)), function(x) {
        tags$div(class = ifelse(historyALL$df[x, "users"] == "Human",
                                "user-message",
                                "bot-message"),
                 HTML(paste0(ifelse(historyALL$df[x, "users"] == "Human",
                                    "<img src='girl.avif' class='img-wrapper2'>",
                                    "<img src='boy.avif' class='img-wrapper2'>"),
                             historyALL$df[x, "content"])))
      })
      do.call(tagList, conversations)
    })

    w$hide()
    execute_at_next_input(runjs(jscode))

    }

  })

  observeEvent(input$remove_chatThread, {
    output$chatThread <- renderUI({return(NULL)})
    historyALL$df <- NULL
    updateTextInput(session, "prompt", value = "")
  })

  observe({
    req(input$clipbtn)
    CopyButtonUpdate(session,
                     id = "clipbtn",
                     label = "Copy",
                     icon = icon("clipboard"),
                     text = as.character(historyALL$val))

  })


}


# Run the application
shinyApp(ui=ui, server=server)
SCSS
$primary-color: #4caf50;
$secondary-color: #f5f5f5;
$border-color: #ccc;
$box-shadow: 0 0 10px rgba(0, 0, 0, 0.2);

.col-sm-4{padding-top:10%}
.col-sm-8{padding-top:5px;}
pre code {border: none !important;}

#chat-container {
  border: 1px solid $border-color;
  border-radius: 5px;
  box-shadow: $box-shadow;
  width : 50vw;
  height: 500px;
  margin: 0 auto;
  display: flex;
  flex-direction: column;
  font-family: "open sans",arial,verdana;
}

@media only screen and (max-width: 768px) {
#chat-container {
  width : 100%;
  height: 450px;
}

#chat-input button {
  width: 30% !important;
  margin-left: 5px !important;
  padding-left: 2px !important;
}

}

#chat-header {
  background-color: $secondary-color;
  padding: 10px;
  border-radius: 5px 5px 0 0;
}

#chat-header h3 {
  margin: 0;
}

#chat-history {
  flex-grow: 1;
  padding: 10px;
  overflow-y: scroll;
}

#message-list {
  list-style: none;
  margin: 0;
  padding: 0;
}

.user-message {
  background-color: $primary-color;
  color: #fff;
  border-radius: 5px;
  padding: 10px;
  margin: 10px 0;
  align-self: flex-end;
  font-size: 16px;
}

.bot-message {
  background-color: $secondary-color;
  color: #000;
  border-radius: 5px;
  padding: 10px;
  margin: 10px 0;
  align-self: flex-start;
  font-size: 14px;
}

#chat-input {
  background-color: $secondary-color;
  padding: 10px;
  border-radius: 0 0 5px 5px;
}


#chat-input button {
  border: none;
  border-radius: 5px;
  background-color: $primary-color;
  color: #fff;
  padding: 10px;
  margin-left: 10px;
  width: 20%;
  cursor: pointer;
}

#chat-header {
  display: flex;
  align-items: center;
}

#chat-header img {
  border-radius: 50%;
  width: 40px;
  height: 40px;
  margin-right: 10px;
}

.img-wrapper {
  display: inline-block;
  vertical-align: middle;
  width: 45px; height: 45px;
  border-radius: 100%; margin-right: 0.8em;
}

.img-wrapper2 {
	max-width: 100%; width: 45px;
      height: 45px; border-radius: 100%;
}
The program above initializes a reactive object to store the conversation history and the latest response from ChatGPT API. When user clicks on Send button, we send a request to the OpenAI API and stores the response and the conversation history in the reactive object. Later we display the stored conversation in Shiny app.
To learn more about how to access ChatGPT in R, you can visit and follow this tutorial - How to use ChatGPT API in R
-
historyALL <- reactiveValues(df = data.frame(), val = character(0))
This line initializes a reactive object calledhistoryALLusing thereactiveValues()function.historyALLis an object that contains two variables:dfandval.dfis initialized as an empty data frame, andvalis initialized as an empty character vector. -
chatGPT <- chatGPT_R(input$apiKey, input$prompt, input$model)
This line creates a variable calledchatGPTthat contains the response from the OpenAI API.chatGPT_Ris a function that takes three arguments:apiKey,prompt, andmodel. These arguments are obtained from user input usinginput$apiKey,input$prompt, andinput$model. -
history <- data.frame(users = c("Human", "AI"), content = c(input$prompt, markdown::mark_html(text=chatGPT)), stringsAsFactors = FALSE)
historyALL$df <- rbind(historyALL$df, history)
This line creates a data frame calledhistorythat contains two columns:usersandcontent.userscolumn contains the names of the users involved in the conversation, while thecontentcolumn contains the text of the conversation. Theinput$promptcontains the user's message, andmarkdown::mark_html(text=chatGPT)formats the chatbot's response in HTML. Thehistorydata frame is then appended to thedfvariable in thehistoryALLreactive object using therbind()function. This line is responsible for storing the conversation history indfso that it can be displayed to the user.
Javascript code takes user to the screen where latest message is displayed. It is essential when lengthy conversation history in ChatBot box.
Learn detailed instructions on how to set up and customize ChatGPT in R with this step-by-step guide.

Deepanshu founded ListenData with a simple objective - Make analytics easy to understand and follow. He has over 10 years of experience in data science. During his tenure, he worked with global clients in various domains like Banking, Insurance, Private Equity, Telecom and HR.
Share Share Tweet