In this tutorial, you will learn how to run ChatGPT in R. We will discuss the OpenAI API which can be called and used to run ChatGPT within R. OpenAI has official documentation for Python and not for R but R users need not feel let down as this tutorial will now provide them with the necessary information.

Most of us are already familiar with ChatGPT so it might not need further introduction. ChatGPT is a smart chatbot that has knowledge in almost every field and provides responses like a human. It understands your query like a human and provides responses accordingly.
Terminologies related to ChatGPT
It is important to understand some terminologies related to ChatGPT because it decides how much you pay and how you use ChatGPT.
In simple words, prompt means a question or search query you want to ask to ChatGPT. Think like this - you have a very smart machine which can answer anything. You can ask it to write an essay, a programming code or anything else you can think of. But the machine requires specific instruction from you on what exactly you want them to do. Hence it is important that prompt should be clear and specific towards the response you wish
Tokens are subwords or words. See some examples below
- lower splits into two tokens: "low" and "er"
- smartest splits into two tokens: "smart" and "est"
- unhappy splits into two tokens: "un" and "happy"
- transformer splits into three tokens: "trans", "form", "er"
- bear is a single token
If you noticed words are split into tokens because they can have different suffix and prefix. "Low" can be lower or lowest so it is important to make the model understand that these words are related.
These tokens decide your usage and billing. OpenAI Team say you can estimate roughly that one token is about four letters for English text. But in reality this varies a lot.
In the previous section you understand what token means. Now it is essential to know the different types of tokens in the world of ChatGPT.
- Prompt Tokens: Number of tokens used in your prompt (question)
- Completion Tokens: Number of tokens used in writing response (answer/output)
Total Tokens = Prompt Tokens + Completion Tokens
Check out this link to understand the pricing structure for using the API.
Steps to Run ChatGPT in R
You can sign up for an account on OpenAI's platform by visiting platform.openai.com. Once you are there, you can create an account using your Google or Microsoft email address. After creating your account, the most important step is to get a secret API key to access the API. Once you have your API key, store it for future reference.
sk-xxxxxxxxxxxxxxxxxxxxxxxxxxxxxxx
Before we can start using ChatGPT in R, we need to install the necessary libraries. The two libraries we will be using are httr and jsonlite. The "httr" library allows us to post our question and fetch response with OpenAI API, while the "jsonlite" library helps to convert R object to JSON format.
install.packages("httr")
install.packages("jsonlite")
apiKey and prompt. First one refers to the OpenAI API Key you generated in the previous step. Second one refers to the question you want to ask to ChatGPT.
library(httr)
library(jsonlite)

apiKey <- "sk-xxxxxxxxxxxxxxxx"
prompt <- "R code to remove duplicates using dplyr. Do not write explanations on replies."

response <- POST(
  url = "https://api.openai.com/v1/chat/completions",
  add_headers(Authorization = paste("Bearer", apiKey)),
  content_type_json(),
  encode = "json",
  body = list(
    model = "gpt-5.4",
    messages = list(list(
      role = "user",
      content = prompt
    ))
  )
)

cat(content(response)$choices[[1]]$message$content)
df %>% distinct()
Since the output is a list, we can extract only the response. Using cat( ) function we can also take care of line breaks in the response. You may have observed the number of tokens API considers for question and generating response.
- Specify model in the model argument in the code above. They always point to the latest released models.
- In OpenAI's API, the
temperatureargument is used to control the creativity or randomness of the generated text. It lies between 0 and 2. A higher temperature value will make the model more likely to generate more surprising and unexpected responses, whereas a lower temperature value will make the model more conservative and predictable. For example, if the temperature is set to 0.5, the generated text will be more focused, whereas if the temperature is set to 1.5, the generated text will be more random. If you are using "o1" or "o3-mini" models, fine tuning parameter isreasoning_effortinstead of temperature. By default, it is set as "medium". You can use any of the possible values - low, medium or high.
R Function for ChatGPT
Here we are creating user defined function in R for ChatGPT which is a robust method of calling ChatGPT in R. It wraps the R code shown in the previous section of this article in function and allows flexibility to user to change arguments of model easily.
chatGPT <- function(prompt,
                    modelName = "o3-mini",
                    temperature = 1,
                    reasoning_effort = "medium",
                    apiKey = Sys.getenv("chatGPT_API_KEY")) {

  if(nchar(apiKey) < 1) {
    apiKey <- readline("Paste your API key here: ")
    Sys.setenv(chatGPT_API_KEY = apiKey)
  }

  # Build the base body
  body <- list(
    model = modelName,
    temperature = temperature,
    messages = list(list(
      role = "user",
      content = prompt
    ))
  )

  # reasoning_effort parameter for reasoning models
  if(tolower(modelName) %in% c("o1", "o3-mini")) {
    body$temperature <- NULL
    body$reasoning_effort <- reasoning_effort
  }

  response <- httr::POST(
    url = "https://api.openai.com/v1/chat/completions",
    httr::add_headers(Authorization = paste("Bearer", apiKey)),
    httr::content_type_json(),
    encode = "json",
    body = body
  )

  if(httr::status_code(response) > 200) {
    stop(httr::content(response))
  }

  trimws(httr::content(response)$choices[[1]]$message$content)
}
# Example
chatGPT(prompt = "Calculate 2+2*4")
When you run the function above first time, it will ask you to enter your API Key. It will save the API Key in chatGPT_API_KEY environment variable so it won't ask for API Key when you run the function next time. Sys.setenv( ) is to store API Key whereas Sys.getenv( ) is to pull the stored API Key.
Sys.setenv(chatGPT_API_KEY = "APIKey") # Set API Key
Sys.getenv("chatGPT_API_KEY") # Get API Key
How to Customize ChatGPT in R
By setting the system role you can control the behavior of ChatGPT. It is useful to provide context to ChatGPT before starting the conversation. It can also be used to set the tone of the conversation.
For example if you want ChatGPT to be funny. To make these changes in R, you can add one more list in the messages portion of the code and the remaining code will remain as it is as shown in the previous section of the article.
In the code below, we are telling ChatGPT to act like an experienced biology professor.
chatGPT <- function(prompt,
                    system_prompt = "",
                    modelName = "o3-mini",
                    temperature = 1,
                    reasoning_effort = "medium",
                    apiKey = Sys.getenv("chatGPT_API_KEY")) {

  if (nchar(apiKey) < 1) {
    apiKey <- readline("Paste your API key here: ")
    Sys.setenv(chatGPT_API_KEY = apiKey)
  }

  # Build the messages list conditionally
  messages <- list()

  # Only include the system message if system_prompt is not blank
  if (nchar(system_prompt) > 0) {
    messages[[length(messages) + 1]] <- list(
      role = "system",
      content = system_prompt
    )
  }

  # Always include the user message
  messages[[length(messages) + 1]] <- list(
    role = "user",
    content = prompt
  )

  # Build the request body
  body <- list(
    model = modelName,
    messages = messages
  )

  # Apply reasoning_effort for reasoning models
  if (tolower(modelName) %in% c("o1", "o3-mini")) {
    body$temperature <- NULL
    body$reasoning_effort <- reasoning_effort
  } else {
    body$temperature <- temperature
  }

  response <- httr::POST(
    url = "https://api.openai.com/v1/chat/completions",
    httr::add_headers(Authorization = paste("Bearer", apiKey)),
    httr::content_type_json(),
    encode = "json",
    body = body
  )

  if (httr::status_code(response) > 200) {
    stop(httr::content(response))
  }

  trimws(httr::content(response)$choices[[1]]$message$content)
}

# Example
response <- chatGPT(
  prompt = "Can you explain the process of photosynthesis?",
  system_prompt = "You are an experienced biology professor who provides clear explanations."
)

cat("ChatGPT Response:", response)
R Function to Make ChatGPT Remember Prior Conversations
By default, OpenAI's API doesn't remember about previous questions in order to answer subsequent questions. This means that if you asked a question like "What is 2+2?" and then followed up with "What is the square of the previous answer?", it wouldn't be able to provide response as it does not recall previous prompt.
You must be wondering this functionality is already there in the ChatGPT website. Yes this functionality exists in the website but not with OpenAI API. To improve ChatGPT's ability to remember previous conversations, you can use the following R function.
chatGPT <- function(prompt,
                    modelName = "o3-mini",
                    temperature = 1,
                    reasoning_effort = "medium",
                    max_tokens = 2048,
                    top_p = 1,
                    apiKey = Sys.getenv("chatGPT_API_KEY")) {

  # Parameters
  params <- list(
    model = modelName,
    temperature = temperature,
    max_tokens = max_tokens,
    top_p = top_p
  )

  # reasoning_effort parameter for reasoning models
  if(tolower(modelName) %in% c("o1", "o3-mini")) {
    params$temperature <- NULL
    params$max_tokens <- NULL
    params$top_p <- NULL
    params$reasoning_effort <- reasoning_effort
  }

  if(nchar(apiKey)<1) {
    apiKey <- readline("Paste your API key here: ")
    Sys.setenv(chatGPT_API_KEY = apiKey)
  }

  # Add the new message to the chat session messages
  chatHistory <<- append(chatHistory, list(list(role = "user", content = prompt)))

  response <- POST(
    url = "https://api.openai.com/v1/chat/completions",
    add_headers("Authorization" = paste("Bearer", apiKey)),
    content_type_json(),
    body = toJSON(c(params, list(messages = chatHistory)), auto_unbox = TRUE)
  )

  if (response$status_code > 200) {
    stop(content(response))
  }

  response <- content(response)
  answer <- trimws(response$choices[[1]]$message$content)
  chatHistory <<- append(chatHistory, list(list(role = "assistant", content = answer)))

  # return
  return(answer)

}
chatHistory <- list()
cat(chatGPT("2+2"))
cat(chatGPT("square of it"))
cat(chatGPT("add 3 to result"))
cat(chatGPT("2+2"))
# 4
cat(chatGPT("square of it"))
# The square of 4 is 16.
cat(chatGPT("add 3 to result"))
# Adding 3 to the result of 16 gives 19.
- It is important to create list as shown above. Name of list must be
chatHistory - max_tokens refers to the maximum number of tokens to generate response. top_p refers to refers to the probability threshold used to select the next word from the probable words.
Get Latest Information via Web Search
The latest ChatGPT-5 model can fetch the latest information from the web based on a given text.
library(httr)
library(jsonlite)

# Set your OpenAI API key
api_key <- "sk-xxxxxx"

# API endpoint
url <- "https://api.openai.com/v1/responses"

# Create the request body
body <- list(
  model = "gpt-5.4",
  tools = list(list(type = "web_search_preview")),
  input = "what was a positive news story from today?"
)

# Send the POST request
response <- POST(
  url,
  add_headers(
    Authorization = paste("Bearer", api_key),
    `Content-Type` = "application/json"
  ),
  body = toJSON(body, auto_unbox = TRUE)
)

# Parse and print response content
content <- content(response, as = "parsed", type = "application/json")
cat(content$output[[2]]$content[[1]]$text)
How to Input Images
The latest ChatGPT-5 model accepts image inputs and returns output in the form of text.
library(httr)
library(jsonlite)

chatGPT_img <- function(prompt,
                    image_url,
                    modelName = "gpt-5.4",
                    detail = "low",
                    apiKey = Sys.getenv("chatGPT_API_KEY")) {

  if(nchar(apiKey)<1) {
    apiKey <- readline("Paste your API key here: ")
    Sys.setenv(chatGPT_API_KEY = apiKey)
  }

  response <- POST(
    url = "https://api.openai.com/v1/chat/completions",
    add_headers(Authorization = paste("Bearer", apiKey)),
    content_type_json(),
    encode = "json",
    body = list(
      model = modelName,
      messages = list(
        list(
          role = "user",
          content = list(
            list(type = "text", text = "prompt"),
            list(
              type = "image_url",
              image_url = list(url = image_url, detail = detail)
            )
          )
        )
      )
    )
  )

  if(status_code(response)>200) {
    stop(content(response))
  }

  trimws(content(response)$choices[[1]]$message$content)
}

cat(chatGPT_img(prompt = "What's in the image?",
                image_url = "https://blogger.googleusercontent.com/img/b/R29vZ2xl/AVvXsEgCGchJj9jVRP0jMND1a6tJXj7RcYWtnCO4J6YcbPTXrNxiCvs_3NSk7h2gB0h2sc_6bTvwPrBeBHwUA45AXAhaw1uuINuPDcHCbARxpgJIXM5Spi_0P45aR6tqZ_yof-YlNn41LhzHjfW-wsV3mhxBug4To8xtgyMzsHLbm3XoaHZmYUdNY1YWJA5rh6cB/s1600/Soccer-1490541_960_720.jpg"))
The image shows a soccer match between two teams, with players wearing different colored uniforms. The player wearing number 16 in a green uniform is attempting to compete for the ball against a player wearing number 2 in a white uniform. There are other players visible in the background, also engaged in the game. The scene takes place on a grassy field, and it appears to be during an evening match. The players are focused, and the moment captures a dynamic motion as they vie for control of the soccer ball.
Batch Processing
OpenAI's Batch API allows you send many requests at once and get the answers later usually within 24 hours. It is cheaper (about 50% less) and allows more requests at a time, making it great for jobs that do not need instant results.
The following code shows how to send multiple prompts to OpenAI as a batch, wait for the results and extract answers automatically.
- Create batch: Convert prompts to JSONL and upload to OpenAI.
- Start job: Create a batch job with the uploaded file.
- Wait: Poll until the job is completed or times out.
- Download: Fetch the output and extract final answers.
library(httr)
library(jsonlite)

# -----------------------------------
# 1) CREATE BATCH JOB
# -----------------------------------
chatGPT_create_batch_job <- function(
    prompts,
    api_key        = Sys.getenv("chatGPT_API_KEY"),
    model_type     = "gpt-5.4",
    word_count     = NULL
) {
  if (nchar(api_key) < 1) {
    api_key <- readline("Paste your API key here: ")
    Sys.setenv(chatGPT_API_KEY = api_key)
  }
  if (length(prompts) == 0) {
    stop("`prompts` cannot be empty.")
  }

  build_jsonl <- function(prompts, model_type, word_count) {
    lines <- lapply(seq_along(prompts), function(i) {
      text <- prompts[i]
      if (!is.null(word_count) && is.numeric(word_count)) {
        text <- paste0(text, " (in ≤", word_count, " words)")
      }
      toJSON(list(
        custom_id = paste0("req-", i),
        method    = "POST",
        url       = "/v1/chat/completions",
        body      = list(
          model    = model_type,
          messages = list(list(role = "user", content = text))
        )
      ), auto_unbox = TRUE)
    })
    paste(lines, collapse = "\n")
  }

  tmpfile <- tempfile(fileext = ".jsonl")
  writeLines(build_jsonl(prompts, model_type, word_count), tmpfile)
  on.exit(unlink(tmpfile), add = TRUE)

  upload <- POST(
    "https://api.openai.com/v1/files",
    add_headers(Authorization = paste("Bearer", api_key)),
    body = list(purpose = "batch",
                file    = upload_file(tmpfile, type = "application/jsonl")),
    encode = "multipart"
  )
  stop_for_status(upload, "upload batch file")
  input_id <- content(upload)$id

  batch <- POST(
    "https://api.openai.com/v1/batches",
    add_headers(Authorization = paste("Bearer", api_key),
                `Content-Type` = "application/json"),
    body = toJSON(list(
      input_file_id     = input_id,
      endpoint          = "/v1/chat/completions",
      completion_window = "24h"
    ), auto_unbox = TRUE)
  )
  stop_for_status(batch, "create batch job")
  info <- content(batch)

  message("Batch created: ", info$id)
  list(batch_id = info$id, input_file_id = input_id)
}

# -----------------------------------
# 2) FETCH & PARSE BATCH RESULTS (latest by default)
# -----------------------------------
chatGPT_get_batch_results <- function(
    batch_id      = NULL,
    api_key       = Sys.getenv("chatGPT_API_KEY"),
    poll_interval = 5,
    timeout_sec   = 60
) {
  if (nchar(api_key) < 1) stop("API key is not set.")

  # pick latest if not provided
  if (is.null(batch_id)) {
    lst <- GET(
      "https://api.openai.com/v1/batches?limit=1",
      add_headers(Authorization = paste("Bearer", api_key))
    )
    stop_for_status(lst, "list batches")
    data_list <- content(lst)$data
    if (length(data_list) < 1) stop("No batch jobs found.")
    batch_id <- data_list[[1]]$id
    message("Using latest batch: ", batch_id)
  }

  start <- Sys.time()

  repeat {
    resp <- GET(
      paste0("https://api.openai.com/v1/batches/", batch_id),
      add_headers(Authorization = paste("Bearer", api_key))
    )
    stop_for_status(resp, "check batch status")
    state <- content(resp)
    status <- state$status
    message("Status: ", status)

    if (status == "completed") break
    if (status %in% c("failed","expired","cancelling","cancelled")) {
      stop("Batch ended with status: ", status)
    }
    if (as.numeric(difftime(Sys.time(), start, units = "secs")) > timeout_sec) {
      stop("Timeout (", timeout_sec, "s) reached; batch not completed yet.")
    }
    Sys.sleep(poll_interval)
  }

  out_id <- state$output_file_id
  if (is.null(out_id)) stop("No output_file_id in completed batch.")

  dl <- GET(
    paste0("https://api.openai.com/v1/files/", out_id, "/content"),
    add_headers(Authorization = paste("Bearer", api_key))
  )
  stop_for_status(dl, "download batch output")
  text <- content(dl, "text", encoding = "UTF-8")

  lines <- Filter(nzchar, strsplit(text, "\n")[[1]])
  responses <- vapply(lines, function(line) {
    entry <- fromJSON(line)
    if (!is.null(entry$error$message)) {
      paste0("Error: ", entry$error$message)
    } else {
      entry$response$body$choices$message$content[1]
    }
  }, character(1))

  unname(responses)
}


# -----------------------------------
# Example:
# -----------------------------------
my_prompts <- c("What is the capital of USA.", "What is the capital of France?")
ids   <- chatGPT_create_batch_job(my_prompts)
ans   <- chatGPT_get_batch_results(timeout_sec = 60)
print(ans)
Suppose you have an image on your local device instead of stored on web. In this case, you need to convert it to base64 image format. Make sure to install base64enc library before running the code below.
library(httr)
library(jsonlite)
library(base64enc)

base64_image <- function(image_path) {
  image_data <- readBin(image_path, "raw", file.info(image_path)$size)
  encoded_image <- base64enc::base64encode(image_data)
  return(encoded_image)
}

chatGPT_img <- function(prompt,
                    image_path,
                    modelName = "gpt-5.4",
                    detail = "low",
                    apiKey = Sys.getenv("chatGPT_API_KEY")) {

  if(nchar(apiKey)<1) {
    apiKey <- readline("Paste your API key here: ")
    Sys.setenv(chatGPT_API_KEY = apiKey)
  }

  base64_img = base64_image(image_path)
  base64_img = paste0("data:image/jpeg;base64,",base64_img)

  response <- POST(
    url = "https://api.openai.com/v1/chat/completions",
    add_headers(Authorization = paste("Bearer", apiKey)),
    content_type_json(),
    encode = "json",
    body = list(
      model = modelName,
      messages = list(
        list(
          role = "user",
          content = list(
            list(type = "text", text = "prompt"),
            list(
              type = "image_url",
              image_url = list(url = base64_img, detail = detail)
            )
          )
        )
      )
    )
  )

  if(status_code(response)>200) {
    stop(content(response))
  }

  trimws(content(response)$choices[[1]]$message$content)
}

cat(chatGPT_img(prompt = "What's in the image?",
                image_path = "C:\\Users\\deepa\\Downloads\\Soccer-1490541_960_720.jpg"))
R function to generate image
Like GPT for text generation, OpenAI has a model called DALL-E to generate or edit image. DALL-E can create highly realistic images that have never clicked before in real-world, based purely on your prompt. It can be used for for various purposes like social media marketing, image for blog post etc. In the code below, it will take your instruction (prompt) as input and create image accordingly.
chatGPT_image <- function(prompt,
                    n = 1,
                    size = c("1024x1024", "256x256", "512x512"),
                    response_format = c("url", "b64_json"),
                    apiKey = Sys.getenv("chatGPT_API_KEY")) {

  if(nchar(apiKey)<1) {
    apiKey <- readline("Paste your API key here: ")
    Sys.setenv(chatGPT_API_KEY = apiKey)
  }

  size <- match.arg(size)
  response_format <- match.arg(response_format)

  response <- POST(
    url = "https://api.openai.com/v1/images/generations",
    add_headers(Authorization = paste("Bearer", apiKey)),
    content_type_json(),
    encode = "json",
    body = list(
      prompt = prompt,
      n = n,
      size =  size,
      response_format = response_format
    )
  )

  if(status_code(response)>200) {
    stop(content(response))
  }

  parsed0 <- httr::content(response, as = "text", encoding = "UTF-8")
  parsed  <- jsonlite::fromJSON(parsed0, flatten = TRUE)
  parsed

}

img <- chatGPT_image("saint sitting on wall street")
img$data$url
The above code returns URL of the generated image which you can paste it to browser (Google Chrome/ Edge) and can see the generated image. To see the image in RStudio, refer the code below.
library(magick)
saint <- image_read(img$data$url)
print(saint)
- n : Number of images to generate
- size : Image size
- response_format : Do you want image in the format of URL or base64 image string?
The function below can be used as an utility to check if API key is correct or not. It may be useful incase you are building an application and want to validate API Key before user starts asking question in the interface.
apiCheck <- function(apiKey = Sys.getenv("chatGPT_API_KEY")) {

  if(nchar(apiKey)<1) {
    apiKey <- readline("Paste your API key here: ")
    Sys.setenv(chatGPT_API_KEY = apiKey)
  }

  x <- httr::GET(
    "https://api.openai.com/v1/models",
    httr::add_headers(Authorization = paste0("Bearer ", apiKey))
  )

  status <- httr::status_code(x)
  if (status == 200) {
    message("Correct API Key. Yeeee!")
  } else {
    stop("Incorrect API Key. Oops!")
  }

}

apiCheck()
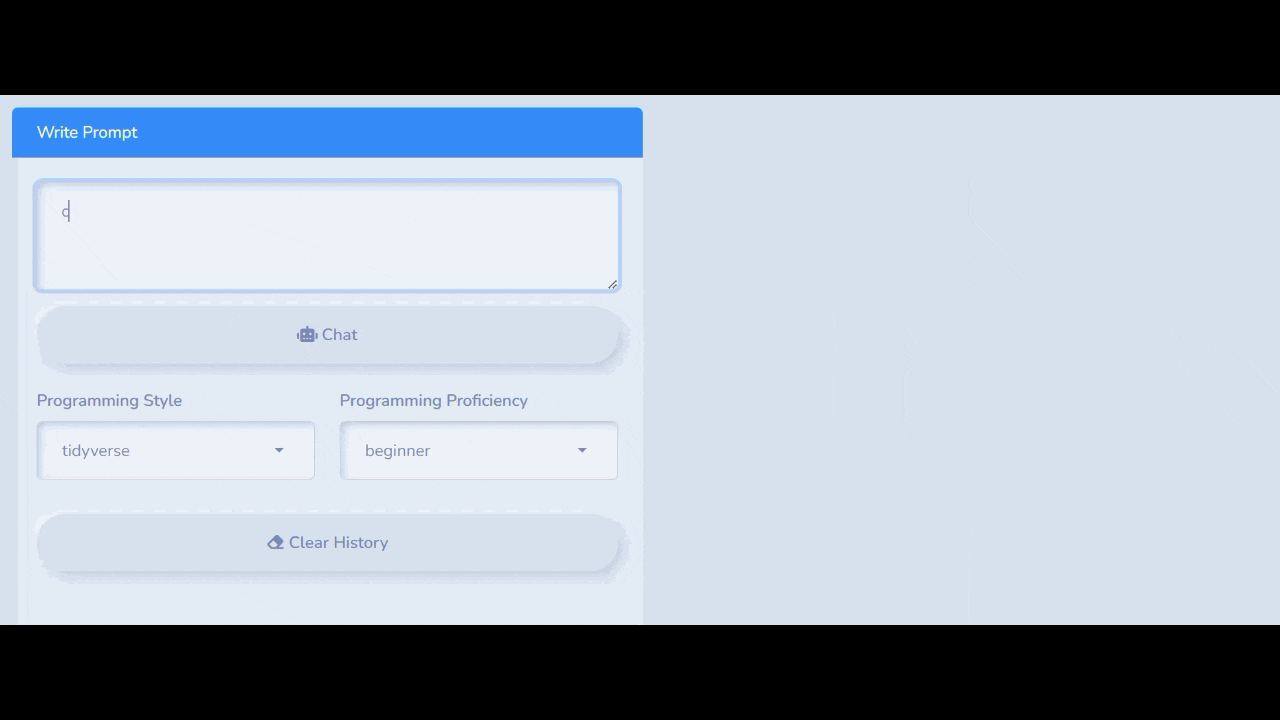
RStudio Add-in for ChatGPT
To have interactive shiny app like ChatGPT website, you can use RStudio add-in for ChatGPT by installing gptstudio package. To install the package, run this command install.packages("gptstudio")
gptstudio:::addin_chatgpt()In the shiny app, you can also select your programming style and proficiency level.
Shiny App for ChatGPT
If you want to build your own ChatGPT clone in shiny, you can visit this tutorial - ChatGPT clone in Shiny. It will help you to build your own customised chatbot for your audience.
ChatGPT prompts for R
Following is a list of some standard ChatGPT prompts you can use for R coding. In case you only want R code as output and do not want explanation of code from ChatGPT, you can use this line in prompt Do not write explanations on replies.
- Explain the following code [Insert code]
- The following code is poorly written. Can you optimise it? [Insert code]
- Can you simplify the following code? [Insert code]
- Can you please convert the following code from Python to R? [Insert code]
- I have a dataset of [describe dataset]. Please write R code for data exploration.

Deepanshu founded ListenData with a simple objective - Make analytics easy to understand and follow. He has over 10 years of experience in data science. During his tenure, he worked with global clients in various domains like Banking, Insurance, Private Equity, Telecom and HR.
Share Share Tweet